
Program Enrollments - Assessments - Program Exits
Bitfocus Resource Links:
How Do I Enroll a Client/HH Into a Program?
How Do I Add a New HH Member To a Program?
How Do I Exit a Client From a Program?
Program Enrollment Click-Through
Program Enrollments
A program (or Project in the HMIS Data Standards) represents a unit of an Agency (or Organization) in which a client or household enrolls. Program enrollments provide the framework for HMIS data collection and reporting.
Creating a Program Enrollment
Before Creating a Program Enrollment
- Be sure to search for the client in Clarity
- If the client is not found in the system, create a new client
- If there are additional household members, create a household
Getting Started
- From the Client Profile, navigate to the Programs tab
- Select the Add icon to create a new program enrollment
TIPS: The Programs tab can be found in the client navigation menu within the client record. Most data entry for clients will be recorded within the Programs tab workspace, which includes information about current and past program enrollments (enrollment history) and an Add icon for creating new program enrollments.

Available Programs
After selecting the Add icon, a list of available programs for your agency will be displayed.
- Select the program you wish to Enroll the client and/or household into from the list of Available Programs
-
Click Next
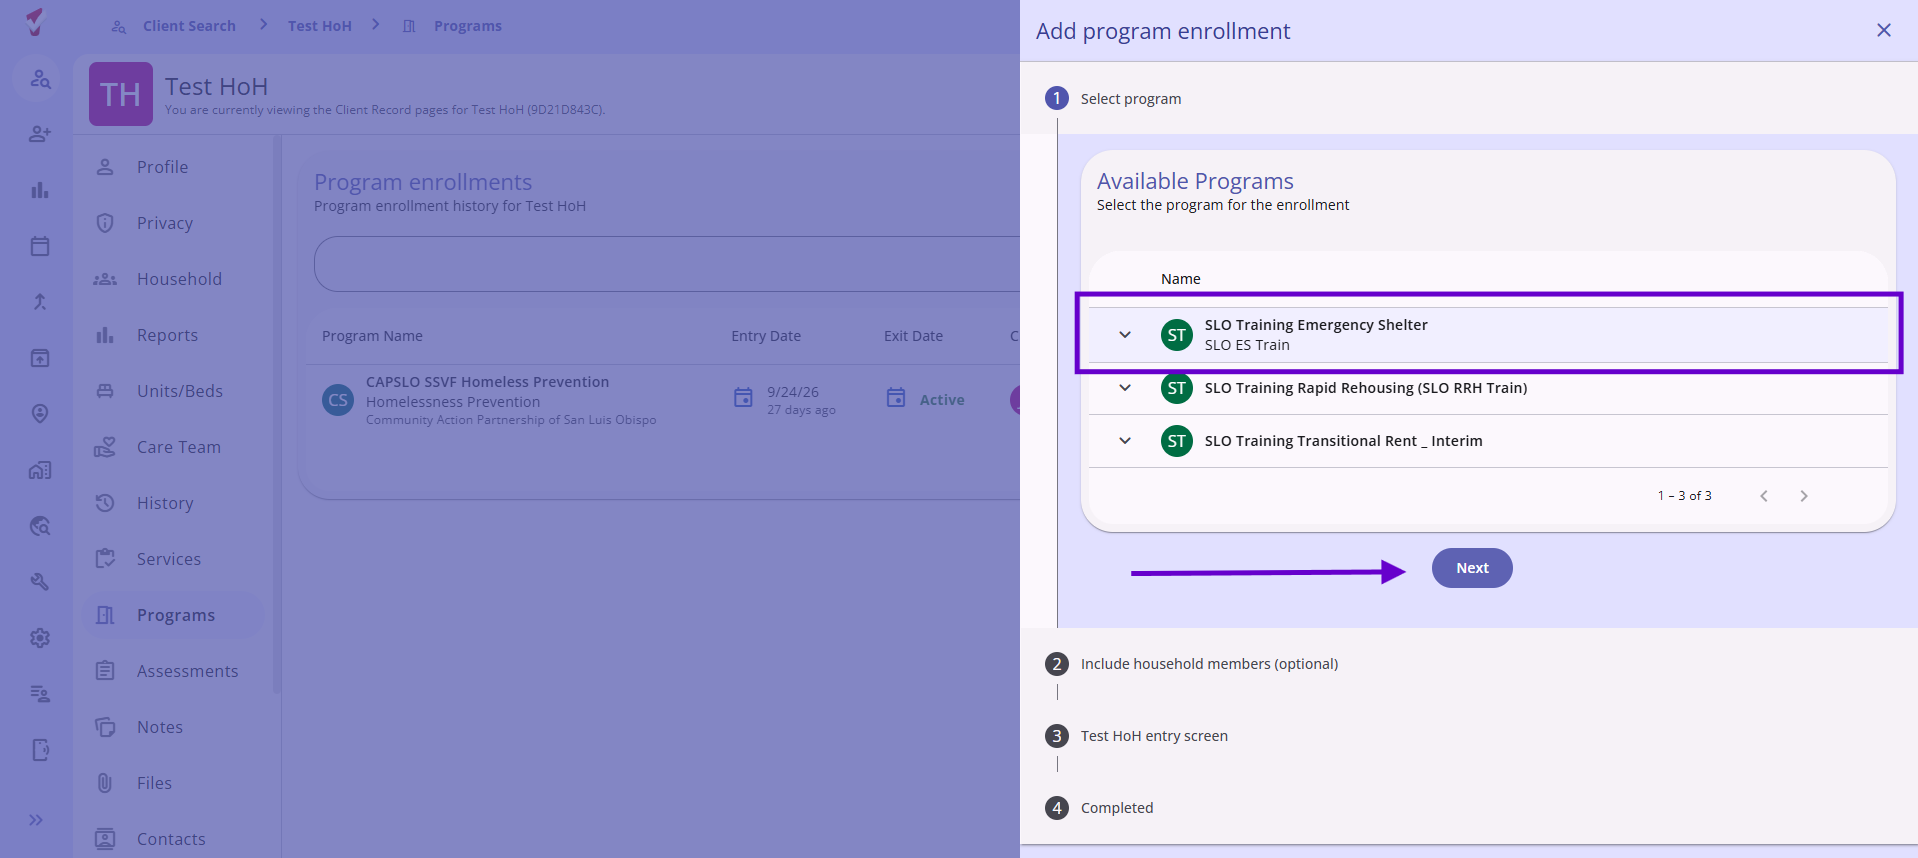
Select from Available Programs
TIP: Additional Program Information
Users may select the downward arrow next to a program to view additional information about that program, including: Program description, active clients, funding source, service categories, and required documents (if applicable). Programs that have documentation requirements will list the required documents for that program in the Required Documents section.

Include Household Members
If you have created a household for the client, you will be prompted to select household members to include in the enrollment.
- If applicable, select household member(s) who should be enrolled in the program
- Click Next
NOTE: Clarity will display a Currently Enrolled label for other household members who are actively enrolled in the same program. Clarity will not display the Currently Enrolled label for a household member whose enrollment in that program starts on a future date.

Enroll Client(s) - Entry Screen
- After clicking Next, the Program Enrollment entry screen will appear
- Be sure to enter the correct Project Start Date for the enrollment.
- All fields must be answered
- Click Save to complete the enrollment screen
- If you are enrolling other household members, you will see a Save & Next button. Clicking this button will enroll the current member and take you to the next step in the workflow.
TIP: The program enrollment workflow is the equivalent of a program intake or entry form and may differ by program/project type and/or agency-specific customizations. The program enrollment entry screen within the program enrollment workflow is sometimes referred to as the program enrollment assessment.
NOTE: Client Data Unknown/Refused vs Data Not Collected
- If the responses to fields are unknown by the client, or client refuses to provide the information, they must be marked as ‘Client Doesn’t Know’ or ‘Client Prefers Not to Answer’
- Only use ‘Data Not Collected’ if the End User did not ask the question to the client
NOTE: Current Living Situation (CLS) Assessment
To ensure compliance from the start, a Current Living Situation (CLS) assessment is automatically listed as a step of a client's program enrollment workflow whenever a user enrolls a client in a CLS-enabled program.
In a CLS-enabled program (such as Street Outreach), the next step after completing the entry screen is the current client HH member's Record Current Living Situation step
- If you are enrolling additional household members, the previous step is followed by the program enrollment entry screen and CLS workflow for the next HH member.

NOTE: Permanent Housing (PH) projects and Housing Move-In Date
Enrollment screens for Permanent Housing (PH) projects will include a Housing Move-In Date (HMID) field. The HMID field should be completed when the client moves into a PH unit.
- If the HMID is not the same as the Project Start Date – leave HMID blank and complete once the HMID is known
- The HMID cannot be prior to the Project Start Date! If a client is transferring into your project and is already housed, the HMID will be the same as the Project Start Date.

Enrollment Completed
Once you have completed all steps within the workflow, a Task Summary page will be displayed. The Task Summary shows which actions were saved within the workflow.
- Review, then click Complete
- Once complete, the system will take you to the Edit Client Program page.
NOTES: Task Summary (Source Bitfocus)
- Program Enrollment: Checked when the enrollment is saved
- Current Living Situation recorded: Checked when a CLS was recorded. When household members are included, the line reads Current Living Situation recorded for [#] household members. This line appears only for CLS-enabled programs.
- Household members enrolled: [#] is checked when you enrolled household members. If you did not select any, the line reads 'No household members enrolled' and shows an empty gray circle. This line appears only for clients with a household.
- If a pending referral was connected during the enrollment, 'Referral Connection Created' appears with an Undo option. Clicking Undo removes the referral connection.
- If a pending Referral was connected to the program during the enrollment process, the Completed screen for the enrollment will show additional information:
- A Task Summary showing which actions were completed
- An Undo option for the referral link.

Making an Enrollment Private
For clients that have an existing HMIS record and choose not to share their information, you can make specific Enrollments private to your agency.
Please refer to the Help Scout article HMIS ROI and Privacy Settings for detailed instructions.
Status Assessments & Annual Assessments
Once an End User has opened a specific Program Enrollment, assessments assigned to that program can be found under the ‘Assessment’ tab.
Note: All programs will have the ‘Status Update Assessment’ and the ‘Annual Assessment’ available to them. Certain program types (Street Outreach, SSVF, etc.) may have additional assessments, such as ‘Current Living Situation’ not included in this document. Please refer to those program specific documents as they become available.
- Navigate to the Assessment tab within the program enrollment
- Click Add
- Select the appropriate assessment, then click Next
- Update the necessary assessment questions, then click Save
-
Click Complete to complete and save the task
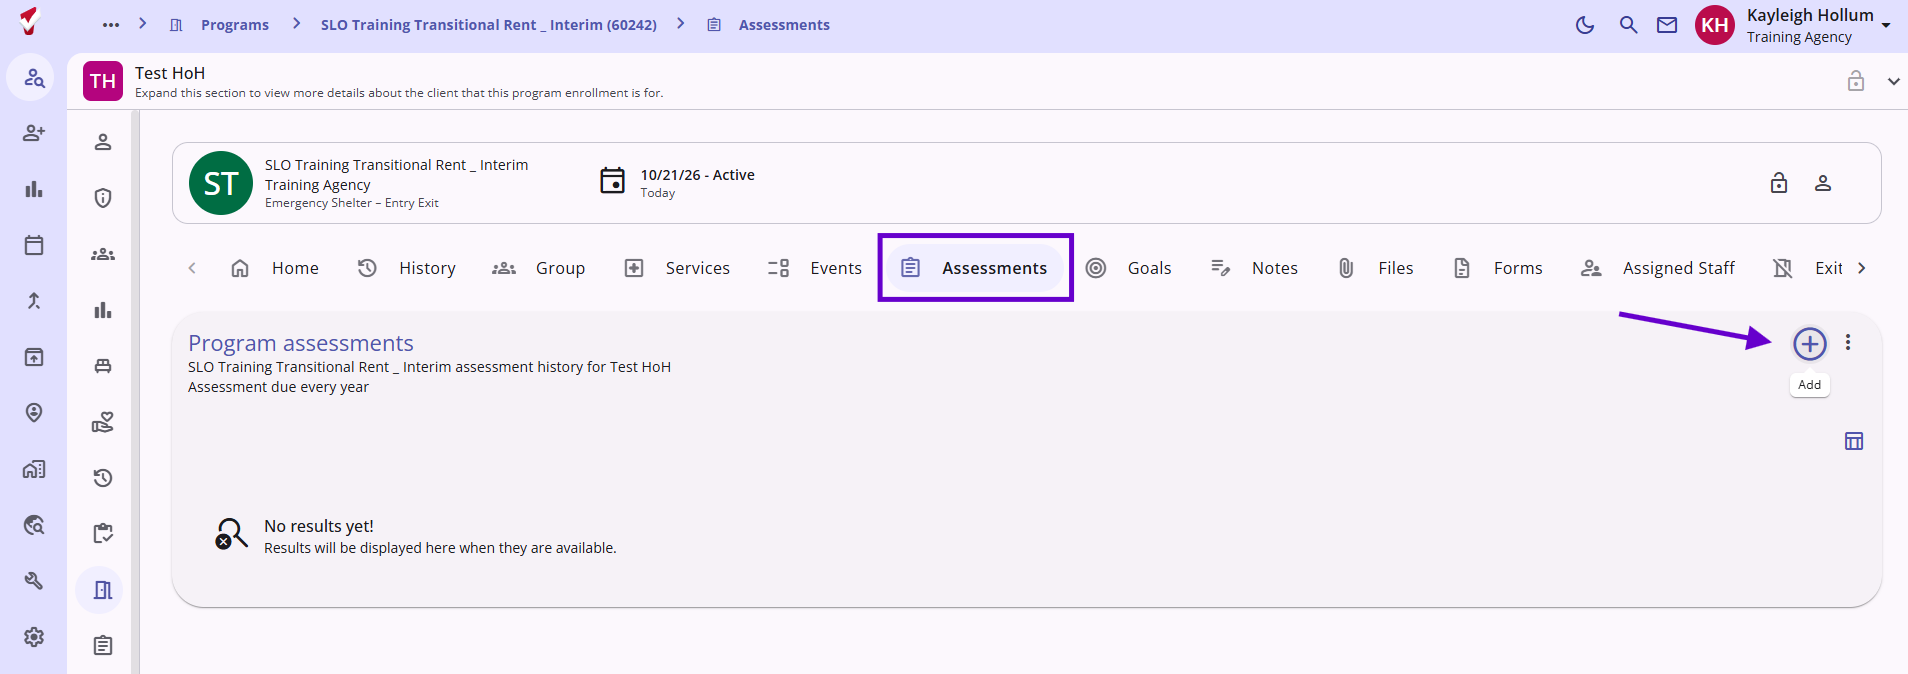
Add Assessments - Once an Assessment has been completed and saved, it will appear under the Assessments tab within the program enrollment.

Status Update Assessment
End Users are required to complete a ‘Status Update Assessment’ any time there is a change to the clients information during a program enrollment. For example, changes to the clients:
- Income
- Disability Status
- Non-Cash Benefits
Annual Assessment
End Users are required to complete an ‘Annual Assessment’ within 30-days, post or prior, of the anniversary date of the Program Enrollment.
NOTE:
- Status and Annual Assessments are tied to the Enrollment. Theses assessments can only be made private if the Enrollment is set to ‘Private’
- Other Assessments(Current Living Situation, etc.) cannot be marked as ‘Private’ while creating it. This must be done after an Assessment has been completed by using the Edit function
Program Exit
- Click the Programs tab from the client navigation menu
- Select the correct Program Name to open that Enrollment

- Click the Exit icon (located on the right side of the Program screen toolbar)
- Select Add

NOTE: If you don't see the Exit icon, select the arrow to scroll navigation forward until you locate the tile.

- From the Exit window, select household members that are to be exited from the program

NOTE: Since we are completing the Program Exit workflow from the Head of Household's Client Profile, we only need to select additional members of the HH that are to be exited from the program in this step. The HoH is included by default.
- Click Next to open the Program’s Exit Assessment
- Make sure that all Exit Assessment questions are answered, updating as necessary
- Check that the Project Exit Date is correct
- For additional household members, clicking Save & Next will open the next Exit Assessment
- Once all household members Exit Assessments are complete, Click Complete

Additional Program Types
Certain Program types (Street Outreach, SSVF, etc.) that have program specific workflows, may have additional steps not included in this document. Please refer to those specific documents as they become available.